Pumpkin cream cheese bread lands right where a good quick bread should: soft, fragrant, and rich enough to feel special without turning heavy. The pumpkin loaf stays moist for days, and the cream cheese layer bakes into a tangy ribbon that cuts through all that warm spice. Sliced cold or just barely warm, it’s the kind of loaf people keep returning to for “one more piece.”
What makes this version work is the balance. The batter is mixed just enough to keep the crumb tender, and the filling gets beaten until completely smooth so it bakes into a clean swirl instead of a lumpy pocket. The spice blend matters too. Cinnamon, nutmeg, and cloves give the loaf depth, but the pumpkin still stays front and center instead of getting buried under too much spice.
Below, I’ll walk through the part that matters most: how to layer and swirl the batter so the cream cheese stays in the middle, not lost at the bottom of the pan. I’ve also included a few practical swaps and storage notes for the days when you want to bake ahead.
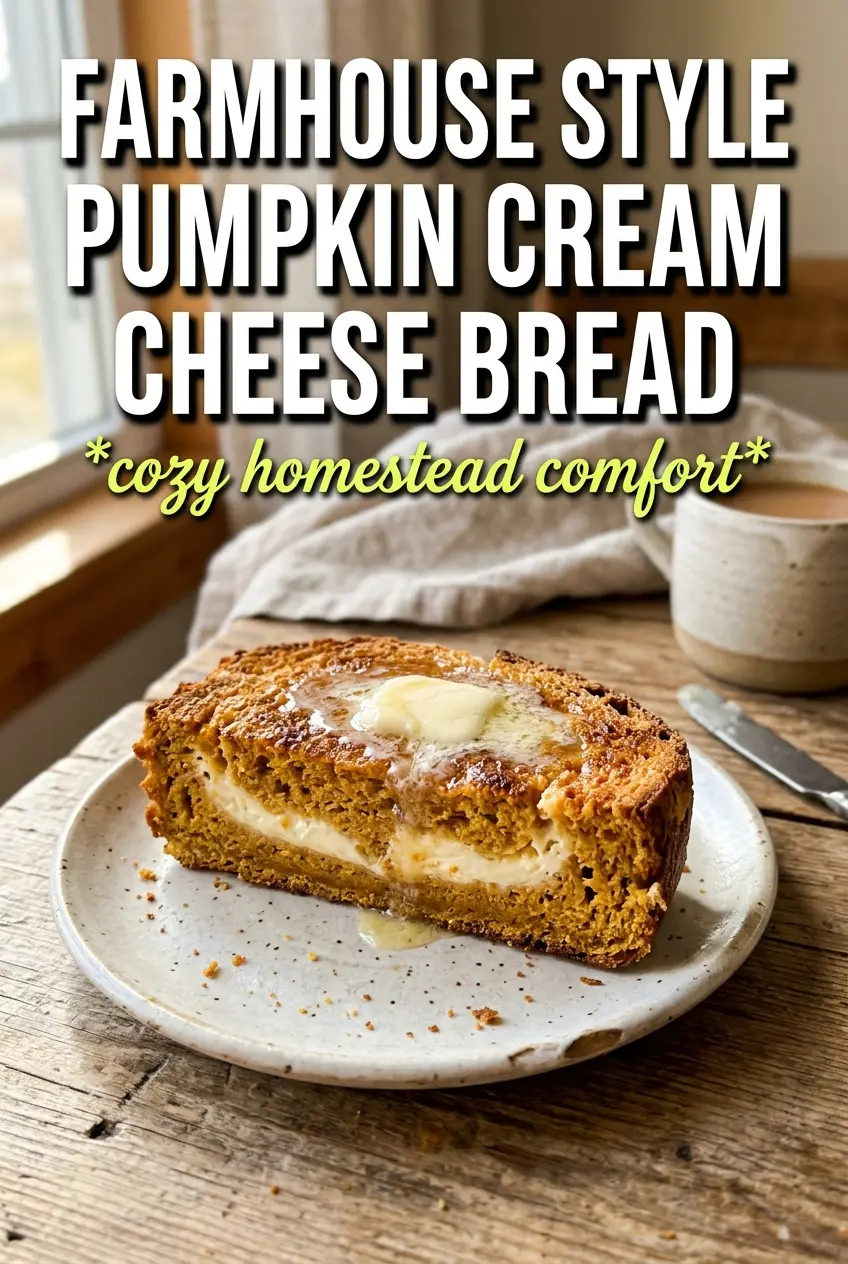
The cream cheese layer stayed right in the middle and the loaf sliced cleanly after cooling. I loved that the pumpkin bread stayed moist without feeling dense, and the cinnamon on top made it smell amazing while it baked.
Like this pumpkin cream cheese bread? Save it to Pinterest for a loaf that bakes up moist, spiced, and swirled with tangy cream cheese.
The Cream Cheese Swirl That Stays in the Middle
The biggest mistake with pumpkin cream cheese bread is overthinking the swirl. If the filling is too loose, it sinks. If the batter is overmixed, the loaf turns tight and the swirls get muddy instead of distinct. The fix is simple: beat the cream cheese filling until it’s completely smooth, then stop mixing the batter the second the flour disappears.
Layering matters just as much as mixing. Half the batter goes in first, then the cream cheese filling gets spooned down the center, then the remaining batter goes on top. That middle placement keeps the filling from leaking out the sides and gives you the thick ribbon people expect when they slice into it.
- Pumpkin puree — Use plain pumpkin puree, not pumpkin pie filling. Pie filling already has sugar and spices added, which throws off both the texture and the balance of the loaf.
- Cream cheese — Full-fat cream cheese gives the filling body and that slightly tangy finish. Low-fat versions can work, but they tend to bake up softer and less defined.
- Vegetable oil — Oil keeps the loaf moist for days. Melted butter gives more flavor, but the bread will set up a little firmer once cooled.
- Eggs — Don’t skip the room-temperature step if your eggs are cold from the fridge. Cold eggs can make the filling look streaky and can keep the batter from blending smoothly.
What Each Ingredient Is Actually Doing in This Recipe
- Primary ingredient (the star) — Quality matters most. Choose the best you can find.
- Cooking medium (oil, butter, or broth) — This carries flavors and prevents dryness.
- Seasonings (salt, pepper, spices, herbs) — Layer flavors so nothing overpowers. Build depth gradually.
- Aromatics (garlic, onion, herbs) — Cook with fat to bloom flavors. Become the foundation.
- Supporting ingredients — Complement the main ingredient without overpowering it.
- Sauce or liquid (if applicable) — Brings flavors together. Balance richness with acid.
- Acid (lemon, vinegar, wine, or other) — Brightens and prevents flat-tasting results.
- Final finish (garnish, glaze, or sauce) — Prevents one-dimensional taste and adds visual appeal.
Building the Loaf Without Beating the Batter Down
Mixing the Spiced Base
Whisk the dry ingredients first so the baking soda and spices are evenly distributed. Then whisk the pumpkin, sugar, eggs, oil, and water until the mixture looks smooth and glossy. Once the flour goes in, switch to a light hand and stop as soon as you no longer see streaks of dry flour. If you keep going, the loaf bakes up tougher and loses that soft, tender crumb.
Making the Filling Smooth Enough to Swirl
Beat the cream cheese, sugar, egg, and vanilla until the mixture is completely smooth and a little fluffy. Any little lumps left in the bowl will show up in the baked loaf, and they won’t disappear in the oven. This filling should look thick enough to spoon, not pour. If it seems loose, the cream cheese probably wasn’t softened enough.
Layering for a Clean Center Stripe
Divide the batter between the two greased loaf pans, then spoon the filling straight down the center of each loaf. Add the remaining batter on top and drag a knife through the center once or twice, just enough to create movement without fully blending the layers. Over-swirling is what blurs the cream cheese into the bread instead of leaving that distinct ribbon in the middle.
Baking Until the Loaf Sets at the Edge
Bake until a toothpick inserted near the edge comes out clean and the center no longer looks wet. The cream cheese center can make a middle toothpick misleading, so use the edges as your test point. If the top browns too quickly, lay a piece of foil loosely over the loaf for the last 15 minutes. Cool the bread completely before slicing or the swirl can smudge and the crumb can tear.
How to Tweak This Loaf Without Losing What Makes It Good
Dairy-Free Version
Swap the cream cheese for a dairy-free cream cheese that’s meant for baking, not spreading only. The filling will still give you that tangy center, but it may bake up a little softer and less sharply defined. Let the loaf cool fully before slicing so the middle has time to set.
Gluten-Free Swap
Use a 1:1 gluten-free baking blend that includes xanthan gum. The texture will be a touch more delicate, and the loaf may need an extra few minutes in the oven. Check the edge of the loaf for doneness instead of relying on the center.
One Big Loaf Instead of Two
You can bake this as one larger loaf if your pan is deep enough, but the bake time will be longer and the center will take more patience. The outside may brown before the middle sets, so foil matters here. Two pans give you a more even bake and a cleaner swirl.
Storage and Reheating
- Refrigerator: Store covered for up to 5 days. The cream cheese filling means it keeps best chilled.
- Freezer: Freeze slices or whole loaves tightly wrapped for up to 2 months. Thaw overnight in the fridge for the cleanest texture.
- Reheating: Warm slices gently in the microwave for 10 to 15 seconds or in a low oven. Don’t overheat it, or the filling can turn greasy and the bread will dry out.
Questions I Get Asked About This Recipe
Joanna Gaines Pumpkin Cream Cheese Bread
Ingredients
Equipment
Method
- Preheat oven to 350F and grease two 9x5 loaf pans, making sure the corners are coated for easy release. Set pans aside on a sheet pan.
- Beat the cream cheese filling until completely smooth, then set it aside at room temperature. The texture should look glossy and free of lumps.
- Whisk the flour, baking soda, cinnamon, nutmeg, cloves, and salt in a large bowl until evenly speckled. This dry mix should be uniform in color.
- Whisk the sugar, pumpkin, eggs, oil, and water until smooth in a separate bowl. Stop when no streaks remain.
- Fold the dry ingredients into the wet ingredients until just combined. Fold only until you no longer see dry flour for a tender crumb.
- Divide half the batter between both loaf pans and spoon it evenly into the bottoms. The surface should be level so the swirl sits in the center.
- Spoon the cream cheese filling down the center of each loaf, leaving a border around the edges. Aim for a continuous line so the swirl stays intact.
- Top each loaf with the remaining batter and spread gently to cover the filling. Avoid overmixing so the swirl doesn’t disappear.
- Swirl gently with a knife by making a few slow passes lengthwise through each loaf. Stop once the knife creates marbled streaks.
- Bake at 350F for 60-65 minutes, until a toothpick inserted at the edge comes out clean. The tops should look set and slightly domed.
- Cool completely before slicing. Letting it set keeps the cream cheese swirl from smearing.