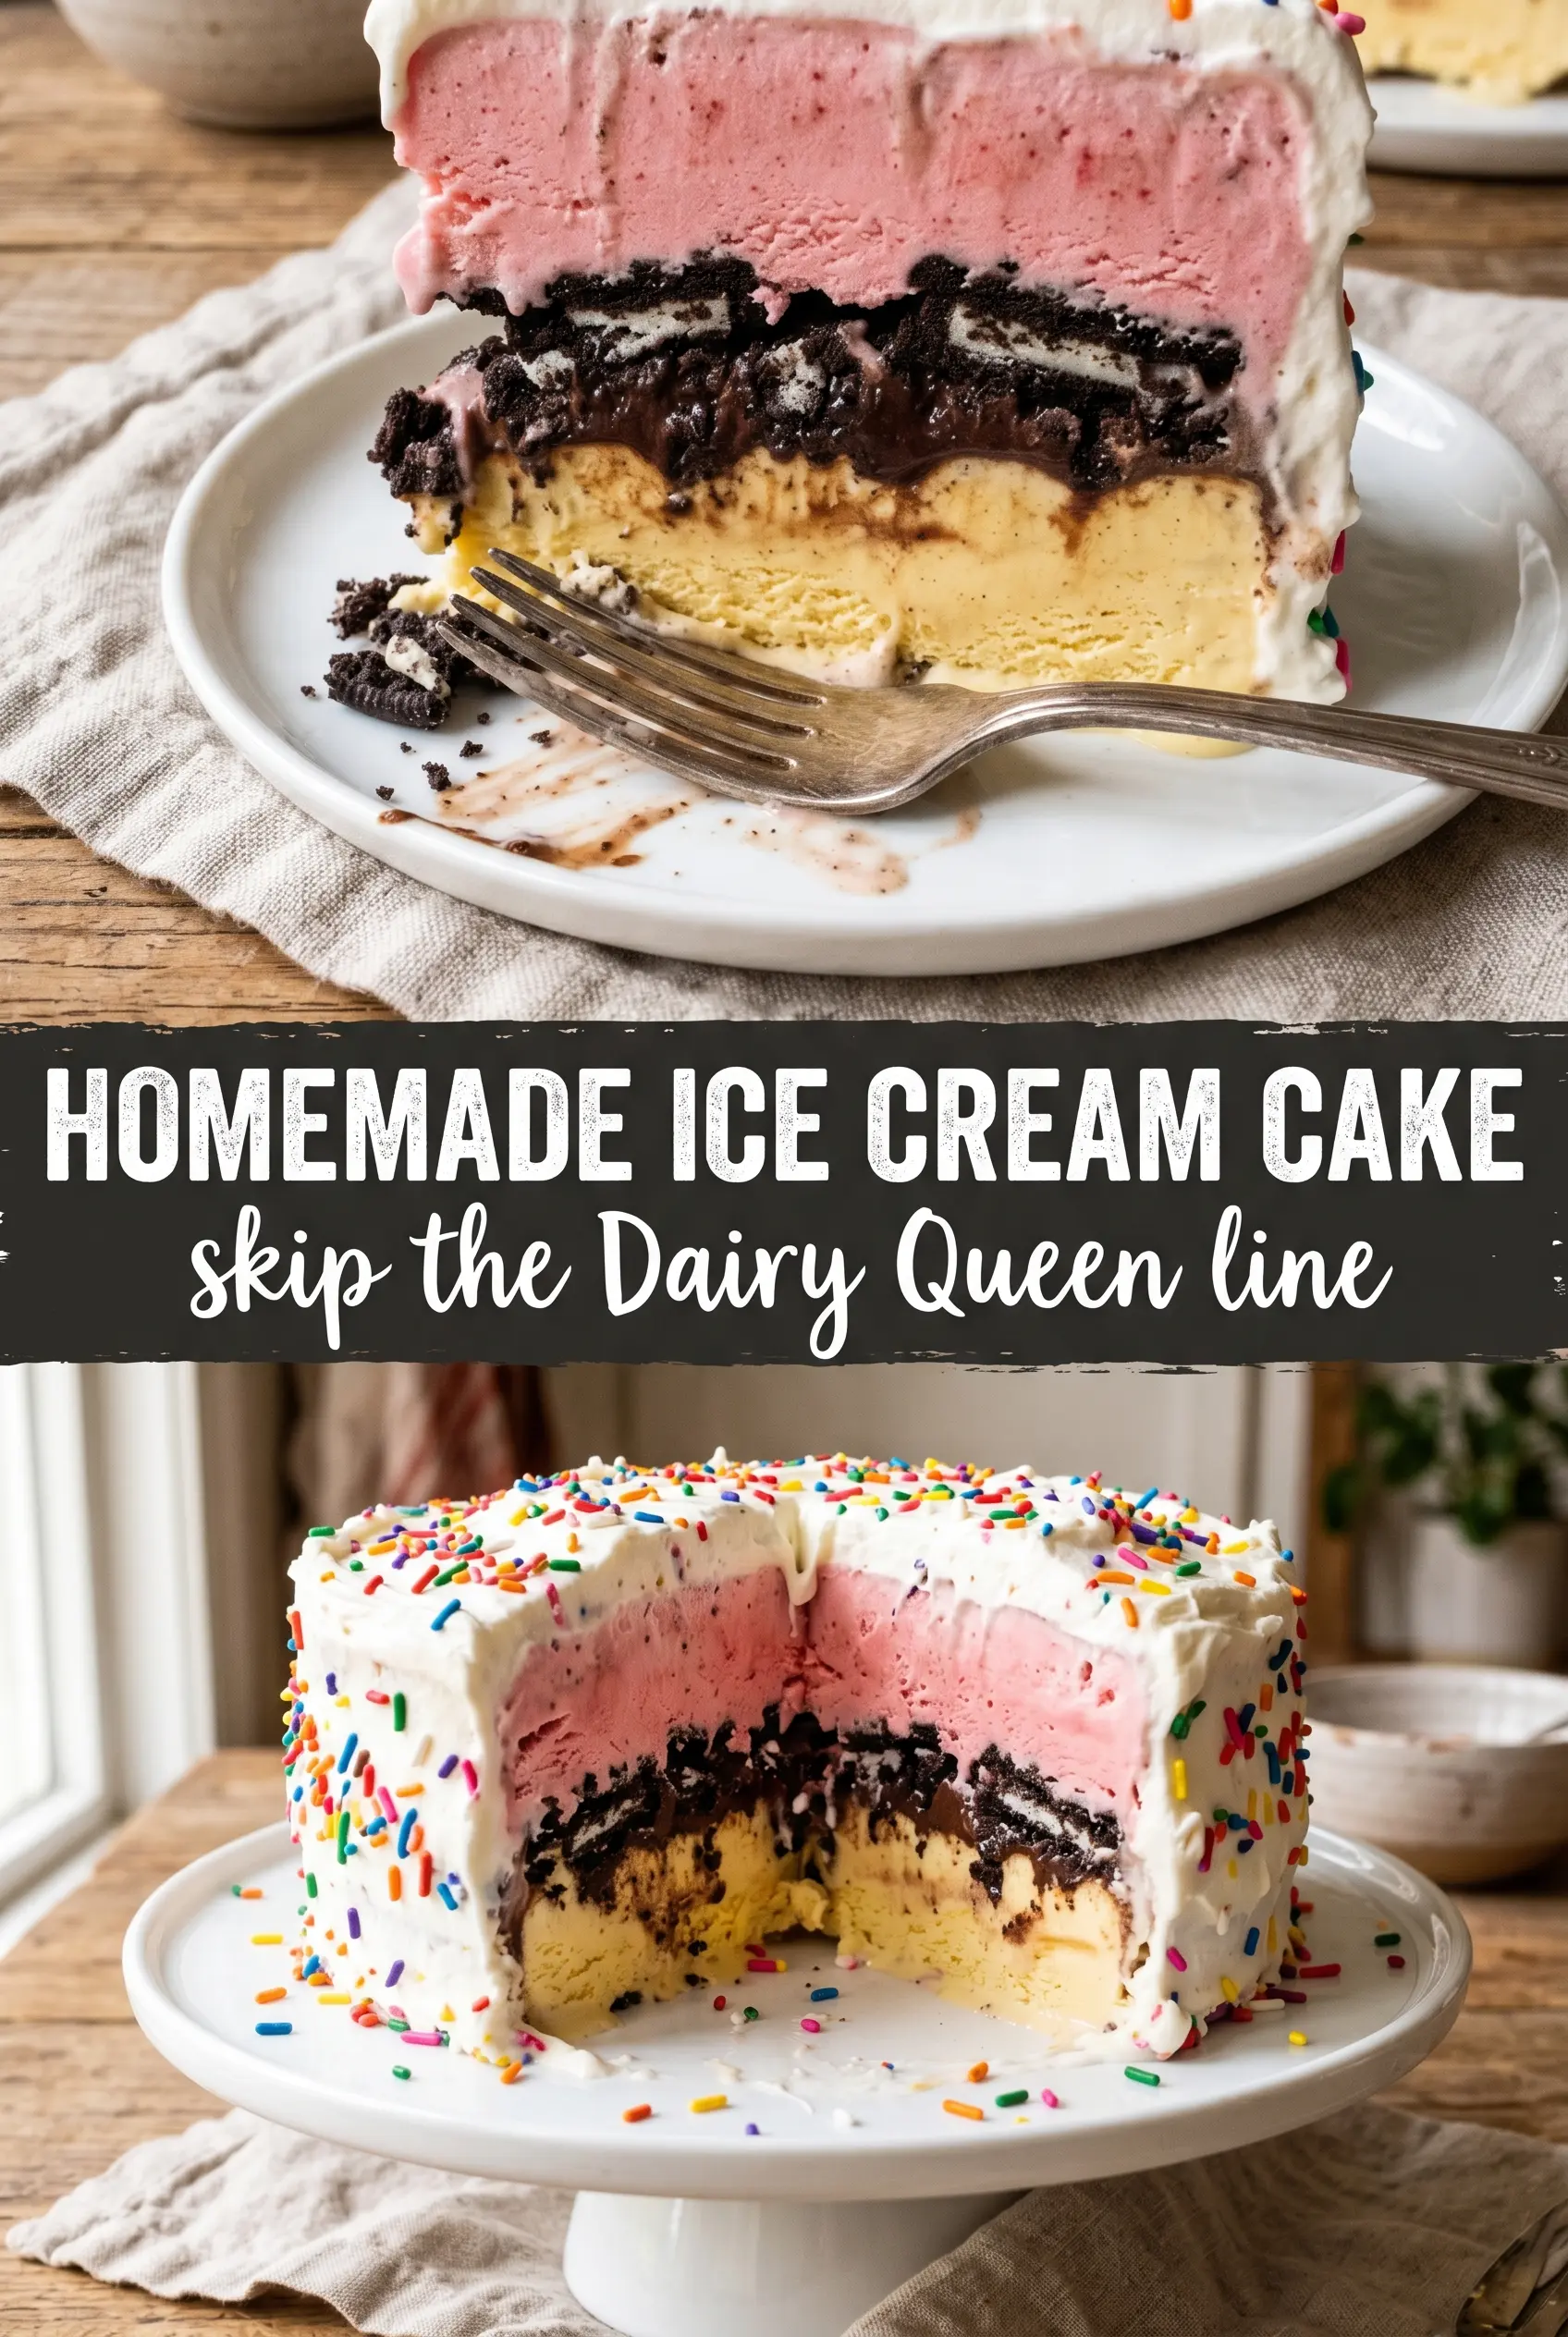
Ice cream cake is one of those desserts that looks like it came from a bakery case, but the whole thing is built with a spoon, a freezer, and a little patience. The best versions slice into clean layers instead of collapsing into a scoopable mess, and the contrast between the Oreo crust, the vanilla and strawberry ice cream, and the fudge ribbon gives every bite a little crunch, creaminess, and chocolate hit all at once.
What makes this version work is the timing. Each layer gets firmed up before the next one goes on, which keeps the fudge from sinking and the ice cream from blending into one muddy layer. Slightly softened ice cream spreads smoothly without tearing the crust, but it still needs to be cold enough to hold its shape once it hits the pan. That balance is what gives you those defined stripes when you slice it.
Below, I’ll walk through the easiest way to build the layers, plus the small tricks that keep the cake neat when it’s time to serve. If you’ve ever fought with a freezer dessert that turned ragged at the edges, the slicing and decorating notes here will help a lot.
The layers stayed separate after freezing, and the hot knife made every slice look clean. I used the stabilized whipped cream on top, and it held its shape even after sitting out for a few minutes.
Save this Oreo ice cream cake for birthdays and summer dessert nights when you want clean layers, a fudge ribbon, and no-bake ease.
The Trick to Keeping the Fudge in a Separate Layer
The easiest place to lose the structure is right after the vanilla ice cream goes in. If the layer isn’t firm enough, the hot fudge will melt straight through and blur the middle into one soft band. Freezing the vanilla layer until it’s set keeps the fudge sitting on top where it belongs, and letting the fudge cool slightly before you drizzle it keeps it from cutting into the ice cream below.
The other failure point is overworking the softened ice cream. You want spreadable, not soupy. If it’s too warm, it will smear the crust and collapse around the edges after freezing. The goal is a smooth top that holds the shape of the pan once it firms up again.
What Each Layer Is Doing in This Cake
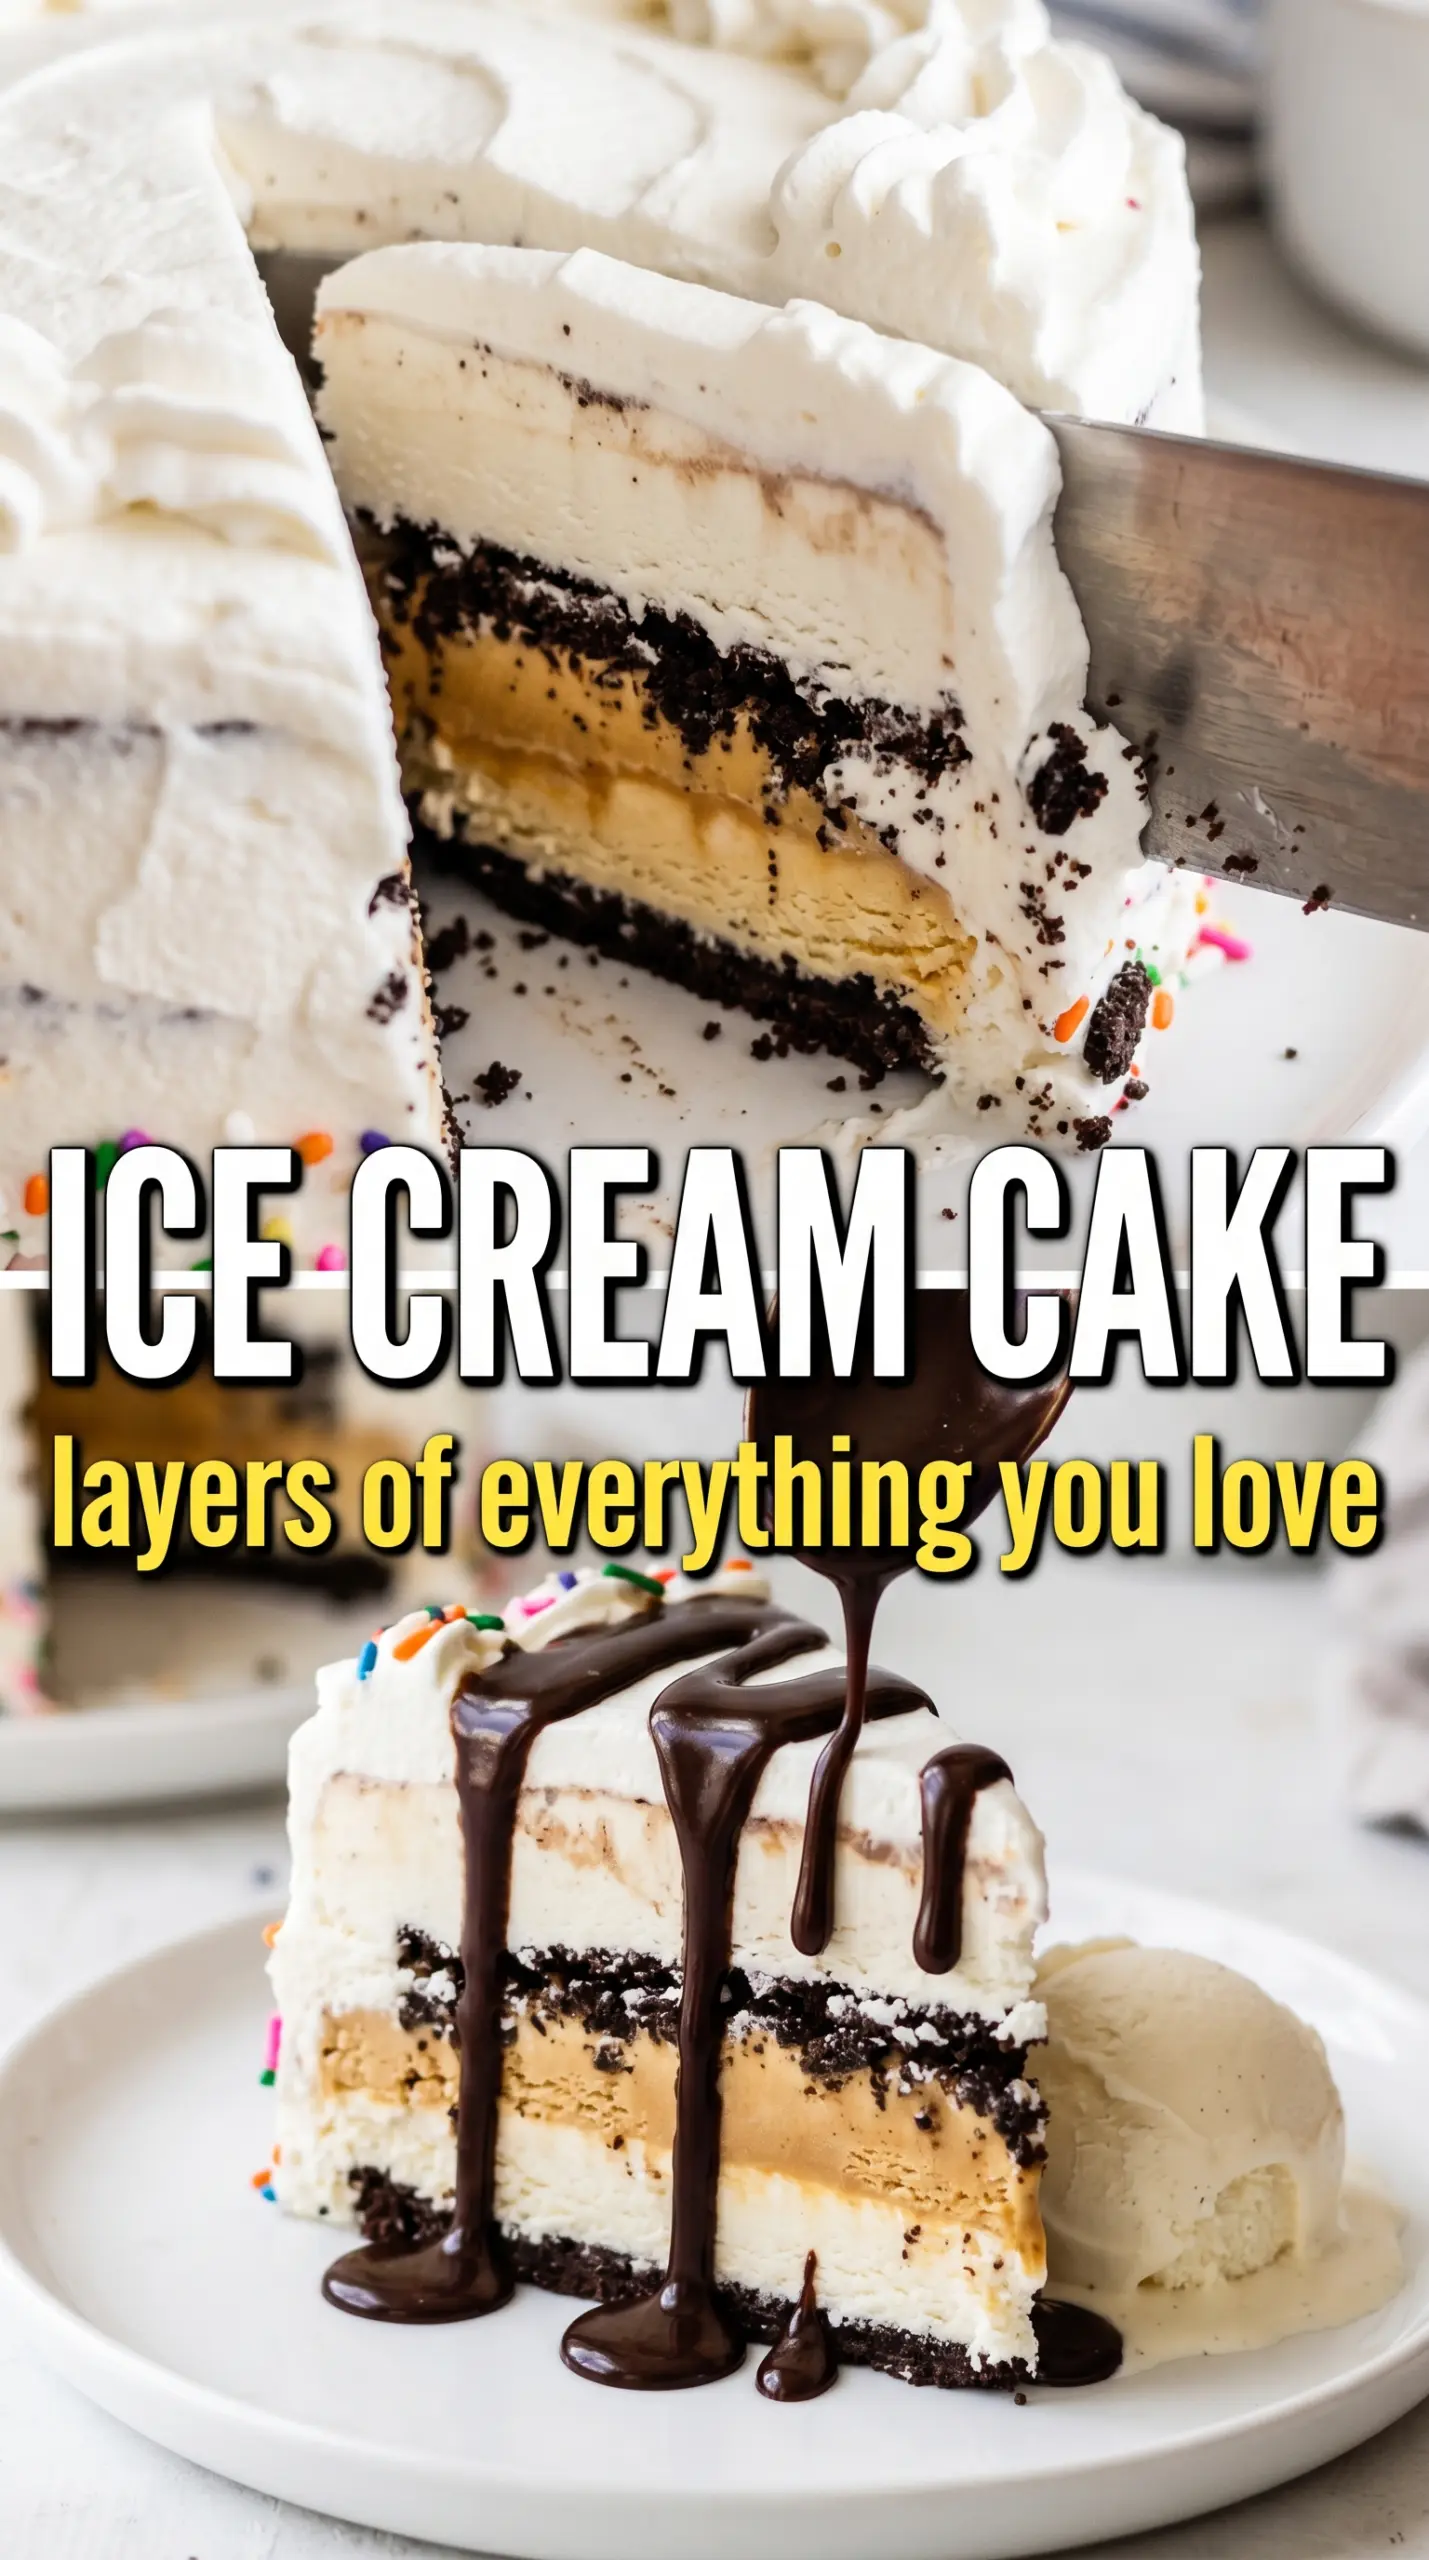
- Oreo cookies — These make the crust without any extra sugar or baking. The cookies turn into a firm, chocolatey base that stays crisp enough to cut through after freezing. A food processor gives you the most even crumbs, but a zip-top bag and rolling pin work fine if the crumbs are fairly fine.
- Melted butter — This is what binds the crust so it slices instead of crumbling apart. Don’t cut it short; dry crumbs won’t pack firmly and the bottom layer will fall apart under the ice cream. Use salted or unsalted butter, but keep the amount exact.
- Vanilla ice cream — This is the sturdy middle layer and the one most likely to show if the cake is sliced cleanly. Slightly softened ice cream spreads without tearing the crust, but it should still mound a little on the spoon. If it gets too soft, it needs to go back in the freezer before the fudge goes on.
- Strawberry ice cream — This adds color, a brighter flavor, and a clear second layer that makes the finished cake look special when sliced. A good-quality strawberry ice cream gives you the strongest berry flavor; if yours is pale or icy, the layer can taste flatter than the vanilla. You can swap in another flavor, but you’ll lose the classic red-and-white look.
- Hot fudge sauce — This is the ribbon that makes the center slice look dramatic. It should be cooled just enough that it pours thickly, not steaming hot. If it’s too warm, it will melt the vanilla layer and disappear into it.
- Whipped topping or stabilized whipped cream — This is for the finished look and for a little soft contrast on top. Stabilized whipped cream holds better if the cake sits out for a few minutes before serving. If you use regular whipped cream, pipe it close to serving time so it doesn’t slump.
How to Build the Layers Without Smearing the Edges
Pressing the Crust Hard Enough
Mix the crushed Oreos with the melted butter until every crumb looks damp, then press the mixture into the bottom of a 9-inch springform pan with the bottom of a measuring cup. You want a tight, even layer that feels compact, not loose and sandy. If the crust is underpacked, it will lift off in shards when you release the pan. Freeze it for 15 minutes before you add the ice cream so it can firm up.
Spreading the Vanilla Layer
Scoop the slightly softened vanilla ice cream onto the chilled crust and spread it into the corners with an offset spatula or the back of a spoon. Work quickly and keep the pressure light so you don’t pull the crust up with the spatula. Freeze it for about an hour until the top feels firm to the touch; that pause is what keeps the fudge in place.
Adding the Fudge at the Right Temperature
Drizzle the cooled hot fudge over the set vanilla layer in thin ribbons so it settles into a distinct band instead of flooding the whole surface. If it’s too hot, it will melt the top of the vanilla layer and make the middle look messy when sliced. Freeze again for 15 minutes so the fudge firms before the strawberry ice cream goes on.
Finishing and Freezing the Top Layer
Spread the strawberry ice cream over the fudge the same way you did the vanilla, then smooth the top and cover the pan with plastic wrap. Freeze the cake for at least 4 hours, though overnight gives you the cleanest slices. If the top layer is still soft when you decorate it, the whipped cream will sink into it instead of sitting neatly on the edge.
Ways to Change the Cake Without Losing the Clean Slice
Make it peanut butter and chocolate
Swap the strawberry ice cream for chocolate ice cream and drizzle peanut butter over the vanilla layer before freezing. The peanut butter adds a salty, richer center, but it should be warmed just enough to drizzle so it doesn’t rip the ice cream underneath.
Use dairy-free ice cream
A good nondairy vanilla and strawberry ice cream will work here, especially if both are dense and not too airy. The texture can be a little softer once sliced, so give the cake the full overnight freeze if you can. Coconut-based versions tend to hold the shape best.
Make a birthday version
Add extra sprinkles between the whipped cream swirls and use a colorful ice cream flavor in one layer, like cake batter or cotton candy. The cake will still slice cleanly, but the inside will look more festive and less classic. Keep the colors separated in distinct layers so the visual effect stays sharp.
Storage and Reheating
- Refrigerator: Don’t store ice cream cake in the refrigerator; it melts too fast and the layers collapse.
- Freezer: Wrap the cake well and freeze for up to 1 week for the best texture. After that, the ice cream can start to pick up freezer flavor and the crust gets drier.
- Reheating: There’s no reheating here. For clean slices, let the cake sit at room temperature for 5 to 10 minutes, then use a hot knife wiped dry between cuts. Cutting it straight from the freezer usually cracks the crust and drags the top layer.
Questions I Get Asked About This Cake
Ice Cream Cake
Ingredients
Equipment
Method
- Mix the crushed Oreo cookies with the melted butter until evenly coated, then press firmly into the bottom of a 9-inch springform pan. Freeze for 15 minutes until the crust looks set and holds together.
- Spread the vanilla ice cream in an even layer over the Oreo crust, smoothing the top as you go. Freeze for 1 hour until firm to the touch.
- Drizzle the slightly cooled hot fudge sauce over the vanilla layer, creating a visible ribbon. Freeze for 15 minutes so the fudge firms up.
- Spread the strawberry ice cream over the fudge layer and smooth the top, then cover with plastic wrap. Freeze for at least 4 hours (or overnight) until fully solid through the center.
- Run a warm knife around the edge, release the springform, and transfer the cake to a serving plate. Wipe the knife as needed for cleaner edges.
- Pipe swirls of whipped topping around the top edge, then scatter rainbow or patriotic sprinkles across the center. Slice with a hot knife and serve immediately for the cleanest layers.