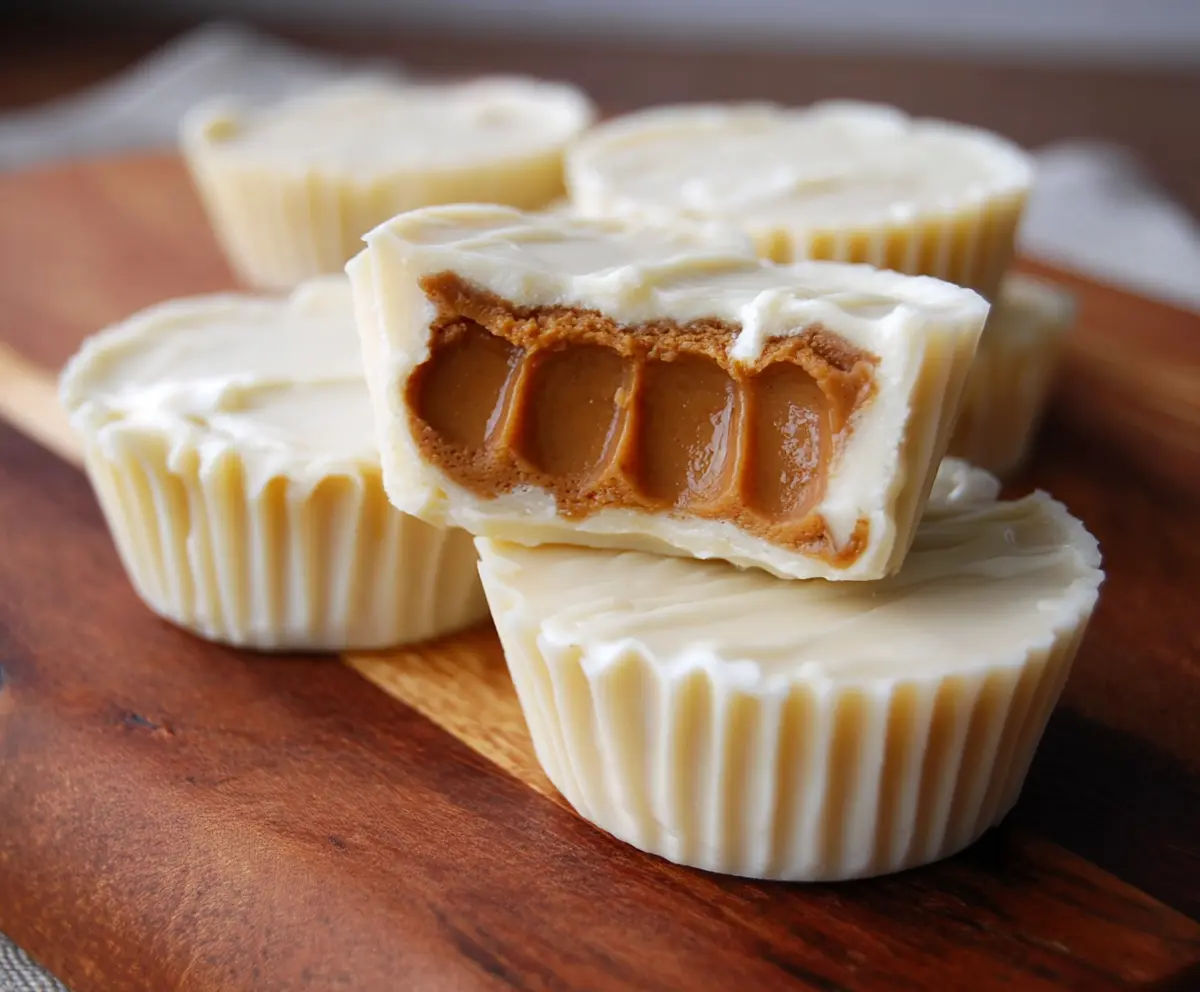
White Chocolate Peanut Butter Cups are a sweet little treat that combines creamy white chocolate with rich, smooth peanut butter. They have a perfect balance of sweetness and saltiness that makes every bite feel like a tiny celebration. These cups are easy to hold, fun to share, and always leave you wanting just one more.
I love making these at home because you can adjust how much peanut butter you use or even sprinkle a pinch of sea salt on top to make them a bit special. They come together quickly, which is great when you want a homemade treat without a lot of fuss. Plus, they’re always a hit with friends and family who sneak back for seconds before you know it!
My favorite way to enjoy these is chilled, right out of the fridge when the white chocolate has that nice, smooth snap. They also make a great gift for anyone who loves peanut butter and chocolate – I always feel like giving a little cup of happiness whenever I share these. If you’re looking for a simple sweet snack that feels a bit fancy, these peanut butter cups are definitely the way to go.
Key Ingredients & Substitutions
White Chocolate: Using good-quality white chocolate chips makes a smooth, creamy shell. If you can’t find white chocolate, you can try white candy melts, but they might be sweeter and less creamy.
Peanut Butter: Creamy peanut butter works best for a smooth filling. Natural peanut butter is great, but if it’s too runny, add a bit more powdered sugar to thicken the filling.
Powdered Sugar: This sweetens and firms up the peanut butter. If you want a less sweet option, reduce the sugar slightly or try powdered erythritol for a sugar-free version.
Vanilla Extract: Adds a lovely depth of flavor to the peanut butter filling. You can skip this if you don’t have it, but it really helps bring the taste together.
How Do I Get Smooth, Even Layers of Chocolate in My Cups?
Making clean layers of white chocolate is easier with just a few steps:
- Use a spoon to spread the melted chocolate evenly in the liners, covering the bottom well.
- Freeze the base layer to set quickly before adding the peanut butter.
- After placing the peanut butter filling, pour the last chocolate layer slowly and evenly over the top.
- Use the back of a spoon to gently smooth the top if needed.
- Chilling the cups well helps the chocolate become firm and gives that satisfying snap when you bite.
Patience is key! Letting each layer set keeps flavors and textures neat, so you get that classic peanut butter cup experience. I find chilling in the freezer speeds the process and keeps shapes perfect.
Equipment You’ll Need
- Mini muffin pan – I use this to shape the cups evenly and make removing them easy.
- Mini cupcake liners – these keep the cups tidy and make serving simple.
- Microwave-safe bowls – perfect for melting the chocolate in short, controlled bursts.
- Spatula or spoon – helps spread the chocolate smoothly in the liners.
- Measuring spoons – for accurate portions of chocolate and filling.
- Refrigerator or freezer – to set the layers quickly and keep the cups firm.
Flavor Variations & Add-Ins
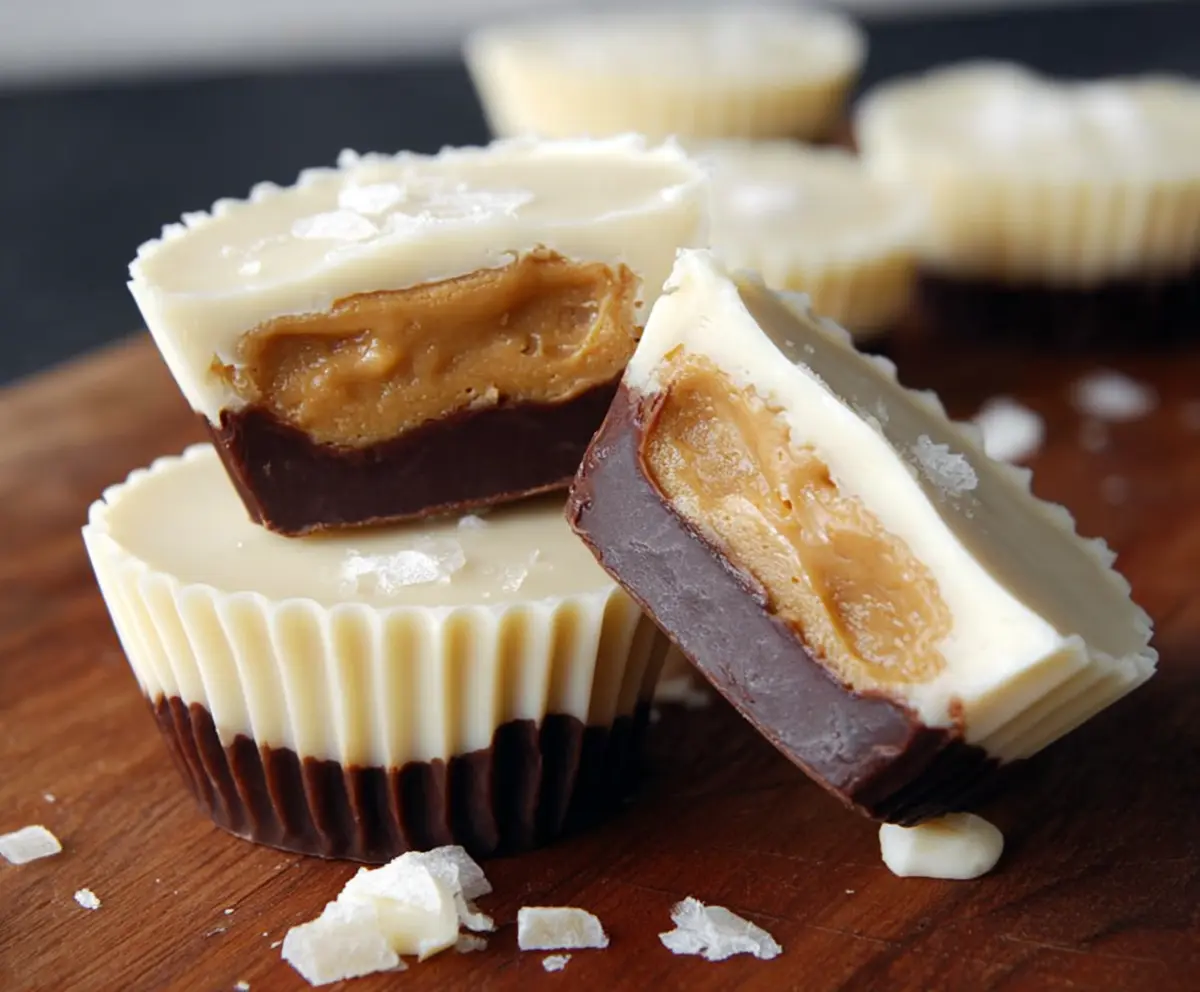
- Use dark or milk chocolate instead of white for a richer flavor. It pairs nicely with peanut butter for a different taste.
- Add a sprinkle of sea salt or chopped nuts on top before chilling to add texture and contrast.
- Mix in a few drops of peppermint or vanilla extract into the peanut butter for extra flavor fun.
- Drop in mini chocolate chips or crushed pretzels into the peanut butter layer for a crunchy surprise inside.
White Chocolate Peanut Butter Cups
Ingredients You’ll Need:
- 2 cups white chocolate chips or chopped white chocolate
- 1 cup creamy peanut butter (natural or smooth)
- 1/4 cup powdered sugar
- 1/4 teaspoon salt (optional, adjust to taste)
- 1 teaspoon vanilla extract
- Mini cupcake liners
How Much Time Will You Need?
This recipe takes about 15 minutes of active prep, plus chilling time. You’ll want to set the chocolate layers in the freezer for about 10 minutes after the base chocolate, and another 20 minutes after assembling. So in total, plan for about 45 minutes to 1 hour, most of which is hands-off chilling time.
Step-by-Step Instructions:
1. Prepare Your Setup:
Start by lining a mini muffin pan with cupcake liners. This will help shape your peanut butter cups and make them easy to remove later.
2. Melt and Layer the White Chocolate Base:
In a microwave-safe bowl, melt 1 1/2 cups of the white chocolate chips in 30-second intervals, stirring after each until smooth. Spoon about 1 teaspoon of melted chocolate into each cupcake liner. Use the back of the spoon to spread it evenly over the bottom. Place the pan into the freezer for 10 minutes to allow the chocolate to firm up.
3. Make the Peanut Butter Filling:
While the chocolate chills, mix the peanut butter, powdered sugar, salt (if using), and vanilla extract together in a bowl until smooth and creamy.
4. Add the Peanut Butter Layer:
Once the chocolate base is set, add about 1 teaspoon of the peanut butter mixture on top of each. Gently press down to flatten the filling, taking care not to spread it to the edges.
5. Finish with More White Chocolate:
Melt the remaining 1/2 cup of white chocolate chips as before. Pour or spoon the melted chocolate over the peanut butter layer, ensuring it’s fully covered. Pop the pan back into the freezer for at least 20 minutes, or until the cups are firm and set.
6. Serve and Store:
When firm, take the peanut butter cups out of the pan and peel off the liners. Store them in an airtight container in the refrigerator. Enjoy them chilled for the perfect creamy and crunchy bite!
Can I Use Natural Peanut Butter in This Recipe?
Yes! Just keep in mind natural peanut butter is usually thinner, so you might want to add a little extra powdered sugar to help the filling firm up properly.
How Should I Store These Peanut Butter Cups?
Store them in an airtight container in the refrigerator. They stay fresh for up to 2 weeks, and tasting them chilled gives the best texture and flavor.
Can I Make These Ahead of Time?
Absolutely! You can prepare the cups and keep them refrigerated for several days before serving. Just keep them covered to prevent odor absorption.
What If I Don’t Have a Mini Muffin Pan?
No worries—you can use a regular muffin pan or silicone molds. Just adjust the amount of chocolate and filling accordingly, and be sure your liners fit well to hold the shape.